Showing posts with label recycle. Show all posts

Sunday, August 14, 2011

Things I Never Knew I Needed


[before]

A few years ago, a good friend of mine introduced me to the sweater shaver. What the heck is a sweater shaver? you may ask… well let me tell ya!

You know those little "pills" that cover your acrylic, wool and cashmere (oh how I LOVE cashmere) clothing? A sweater shaver will collect and REMOVE them!


Run the shaver over the affected area and — presto! — no more "pills"! Your clothing will look fantastic again! My shaver in the photo above is a large electric model. I started out with this small battery powered shaver but soon, I was shaving everything in site which meant I had to empty the collection compartment quite often. A large electric shaver has a bigger collection bin and makes quick work of large and small projects.
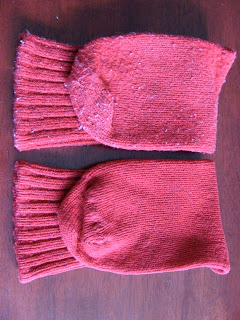


So, before you toss your "pilly" socks, sweaters etc. — have a go at them with a sweater shaver.

I have to say, I get quite a sense of accomplishment by shaving something that is quite pilly… (yes, I do find joy in the smallest of things!)


[after]

Friday, April 15, 2011

New Uses for Old Things #4

Inspired by an empty Tic Tac® box, these mini-er than mini business cards are a fun way to market your work! I used a large box for this tutorial but you can size your cards to fit the standard box (they'll just be even mini-er!)

Here's what you need:


• an empty mint box


• heavy card stock

• a ruler
• scissors or paper trimmer
• rounded corner punch (optional)

Step 1:
Peel the label from your container and pop the top off.
Soak both pieces in hot, soapy water and then rub clean (this should get rid of any label residue). Mineral oil will remove any remaining sticky bits (be sure to wash the box again with soapy water to remove all traces of oil).
Allow to air dry completely.


Step 2:
Before you make your mini-mini cards, you need to take two measurements: the height of your container and the width of the lid opening. These measurements will determine the size of your mini-mini cards. For your cards to easily slide out of the case they need to be slightly smaller than the measurements you get. For example: the measurements I took from this large container mean that each of my cards will be 1cm wide by 5.5 cm long.


Step 3:
Create your cards!
Design them on your computer and print them out or cut your card strips and write them out by hand. If you decide to print them from your computer and you want double-sided cards, you may have to do some test prints to ensure your front and back images line up.


Step 4:
Cut 'em out!
(you can round the ends for added flair!)


Have some fun!
Add some quotes, a discount code or holiday greeting etc.


Make lots!
(the large container shown here holds 120 cards)


Step 5:
Place your cards in the container and pop the top back on.
Your ready to start marketing your work! I'm sure you can think of many creative ways to utilize these teeny promo tools!


Have fun!

Friday, March 5, 2010

Etsy Trashion Street Team


I am also a proud member of the Etsy Trashion Street Team. We are a group of Etsy sellers who focus on recycling and upcycling all kinds of discarded and found materials. We are creative artists and crafters who are dedicated to making trash into treasure!

Tuesday, March 2, 2010

Etsy Recyclers Guild Team


I am now a member of the Etsy Recyclers Guild Team ~ yay! Go Team!